crafts · Knitting · Tutorials

Knitted Pumpkins

Getting into the spirit of the season I have been looking for more and more ideas to decorate my home, gifts to make, etc. I purchased a knitting machine at the beginning of the year so that I would have something to do while I recuperated after knee surgery. Needless to say, there has been a bit of a learning curve. I started with hats. I can write more about it in a future blog.

I wanted to try something new and give it a try to make these cute pumpkins. The most difficult part of making these was making sure the stitches don’t drop.

I begin with what I call waste yarn. You will use this several times so do not worry about it too much. You do want it to be in contrast to the color you are going to use. You should do approximately 5 rows.

When you are done with that you should do one row of yet another color. (this is my way to do things, you may find another way to do it that works for you.) To cast on this knitting machine you need to weave the yarn in front of and then behind each of the pins. You do this until you get back to the white pin. (one time around) At this time make sure your yarn is in the trough before you begin. You will also want to start your counter which is built into the machine. Once you start winding your handle the yarn will begin to knit.

Once you have the second waste yarn done, (only one time around till you get back to the white pin. It is very important that your yarn is in the trough. If it is not then you will drop stitches like crazy. The examples below are if the tension is off. This can be caused by some yarns that are too thick for the knitting machine. The stitches did not actually drop but did not knit smoothly.

Now to get on with the pumpkin. The size of the pumpkin is dictated by the number of rows that you do. For my pumpkins, I knitted 50 rows. You can also change the look and size by how much you stuff it. Getting the pumpkin off the machine (casting off) you need to add knitted waste yarn also. First, knit one row of contrasting color yarn, and then Second, the five rows of another color yarn. To get the yarn off the machine, you need to take the yarn out of the trough and pull it towards the center of the machine. You go around twice and it comes off completely. (the other way you do not need to use waste yarn. You use a sewing needle and take the yarn from your knitting and take each stitch off the hook (or pin) all the way around. The pumpkin will look like the grey one in the first picture. You will pull the threads together (gather) and tie a knot. You will do the same at the other end

leaving an opening large enough to fill with stuffing. Fill the pumpkin to the fullness that you like. I used a stick for the top of the pumpkin. I choose to decorate my pumpkins but you can leave them at this point. I did use yarn of the same color to make the creases in the pumpkins to make them look more like pumpkins.

I prefer orange pumpkins but decided to make them in several popular colors. I think I may try to make a snowman in the same way. I of course will show you in a future blog post if I succeed. Can’t wait to see your pumpkins!

Enjoy the fall weather!

Tusen Tak

Roxanne

Decorations · machine embroidery · Tutorials

Add a Little bit of Lace to Your Autumn

Machine Embroidered napkins

I am a big believer in using fabric napkins while you are having your meals. That includes your every day means not just special occasions. I think in the hustle and bustle of our busy lives we have forgotten how to have a nice slow dinner with a nice set table and everyone sit together and discuss how their days went. I would suggest that you create a box to put everyone’s electronics in so there is not disturbances during dinner. Get the kids involved in the meal planning and table setting. It will bring the family together. Ok maybe not all families but it is worth a shot. So each year I make new napkins for Thanksgiving, Halloween and Christmas. These napkins are more elaborate that my every day napkins. So, without further ado, let’s get started.

I buy ready made napkins for this project. I want to focus on the machine embroidery and not the sewing. I was making a set of 8 napkins but then I do not entertain like I used to. So now I make a set of 4 for myself. I usually end up making a set for some family members also when they request them.

Pattern can be found here. Embroidery Online (complete directions are included when you purchase the pattern.)

OESD AquaMesh WashAway

Isacord thread per thread chart
• Bobbin with matching Isacord thread
• OESD Expert Embroidery Tape WashAway (optional)
• OESD Perfect Embroidery Press Cloth
• Prepared lace pieces; rinsed, dried and pressed
• Napkins

Size Inches: 5.77 X 5.11 in. Size mm: 146.6 X 129.8 mm Stitch Count: 25307 St.

DESIGN

n 1. Fabric Corner Placement Stitch ………………… 0870
n 2. Cut Line and Tackdown ……………………………. 0870
n 3. Cream Lace……………………………………………. 0870
n 4. Yellow Lace ……………………………………………. 0622
n 5. Gold Lace………………………………………………. 0922
n 6. Green Lace…………………………………………….. 0442

To do this project you will need to hoop 3 layers of OESD AquaMesh WashAway. Once you have the stabilizer hooped and read to embroider set it in your embroidery machine. You need to set up your pattern in your computer on your machine and set your colors of thread. The leaf pattern has four colors.

Stitch color 1, Fabric Corner Placement
Stitch.

Stitch color 2, Cut Line and Tackdown

Trim the corner of the napkin or tablecloth
as closely as possible to the cut line. Be sure
to trim on the side that will cut away the
corner and leave the body intact.

Continue to match the bobbin to the top
thread, sew the remaining colors of the
design.

Autumn Napkin Corner 1

I decided in addition to the napkins, I would make a table runner. The directions are much the same for the table runner as it is for the napkins.

12783-01 Leaf Tablecloth Corner FSL

Leaf Tablecloth Corner FSL

Pattern for the table runner is also found here: Embroidery Online

Isacord Thread Colors
0721 Antique
0741 Wheat
1010 Toast
1032 Bronze
1133 Peru
1332 Harvest

Size Inches: 5.03 X 8.20 in. Size mm: 127.76 X 208.28 mm Stitch Count:38,164 St.

n 1. Corner Placement Stitch ………………………….. 0721
n 2. Cut Line and Tackdown ……………………………. 0721
n 3. Fabric Detail …………………………………………… 0721
n 4. Lace Detail …………………………………………….. 0741

This project was a lot of fun and I am looking forward to doing more of them and playing with the color of threads. (The website where I bought the embroidery patterns has all the instructions in pdf for you to download. )

Have fun decorating your home with all the beautiful things you can make, sew, and embroider! Here are some autumn pictures for you.

Have fun, share ideas, stay safe and healthy,

Roxanne

Decorations · Tutorials

Creating Autumn in Your Home

Buffalo Print Flower Pots

One of the patterns that are currently popular with the Farmhouse look is the buffalo print. I saw an idea on Pinterest and decided to do my version of a buffalo print on a flower pot. I have this particular print sprinkled all over my house. I have decorated my house with an eclectic style due to getting my furniture and decorations from everywhere. I choose furniture that I can alter by painting or adding to it. I choose many of my decorations by making them or finding them at the flea market or shopping around garage sales. The search is part of the fun in the decorating.


List of supplies
Clay flower pots, you can also paint on plastic pots.
Clay Pot sealer
Acrylic paints, white and black
Paintbrushes ( in the sizes you want the grid work)
Painters tape


The first thing you are going to do is seal your clay flower pots inside and out.
Tape under the edge to paint black paint around the rim of the pot. I also paint the top portion of the inside of the pot, so it looks more finished.


Once the paint is dry, basecoat the bottom half of the pot in white paint.
When the paint is dry, put your painters tap around the pot to mark off where you are going to paint black paint. I just freehanded my lines, but you may not want your lines a little messy.
Once you are done painting, and the paint is dry, seal the outside of the pot to protect the paint.

Two of the pots I hot glued together to create height. The pots are pretty small.

The larger pot is on my kitchen table with a flower arrangement in it.

A Center Piece for a Table or Side Table

This next piece I created was very inexpensive. I got the idea watching some YouTube videos. This was a fast and easy decoration.

Materials

2 Farm Fresh signs from the Dollar Store

Paint sticks from Walmart

Flowers from Walmart

Craft sticks from Walmart

The stuffed pumpkins I made several years ago and had on hand

I painted the paint sticks black. Then I hot glued the sticks to the backside of the pumpkins to create a basket. I also hot glued the craft sticks to the bottom of the basket to give it stability. I did not even seal the wood after painting. You can put your choice of flowers and leave out the pumpkins if you like. Enjoy!

Here is some of the rest of the stuff I decorated the house with. I hope you enjoy it. I look forward to your comments and feedback. Suggestions for future projects etc.

Be Safe, Be Well, Be Happy

Roxanne

Decorations · Tutorials

Creative Autumn Decorating

Autumn is one of my favorite times of the year. I love to start pulling things out to decorate slowly on the first day of school. The first thing to go up is usually the wreath. Apparently I love making wreaths and have to make new ones every year. Sometimes I build on the wreath from the year before or start from scratch. For me, part of the fun is hunting down the parts to make the decorations. I start looking in the stores as soon as they put them out. Secret is, if you wait till it is close to the holiday you will not find what you are looking for. I search every where, in stores, in craft stores, Goodwill and more. You never know what you will find. When I go shopping I usually set myself a budget and a list. Shopping with a list helps me stay focused because I think up ten more ideas while I am shopping and sometimes come home empty handed because I cannot make up my mind.

Autumn wreath

This was my first project. Originally I was going to just use hydrangeas but changed my mind. I also was going to make the flowers out of coffee filters and thought better of it since it was going to be outside. What I did do was make the wreath by building on one I started last year. Saved me a good chunk of money by doing so.

Wreath in progress

The wreath I started with was full of fall leaves only. This year I added hydrangeas and floral picks to fill the wreath out. I only bought 9 hydrangeas, 3 in each color. I bought 4 floral picks. I bought everything at Hobby Lobby and everything was 40% off on sale.

wreath in progress
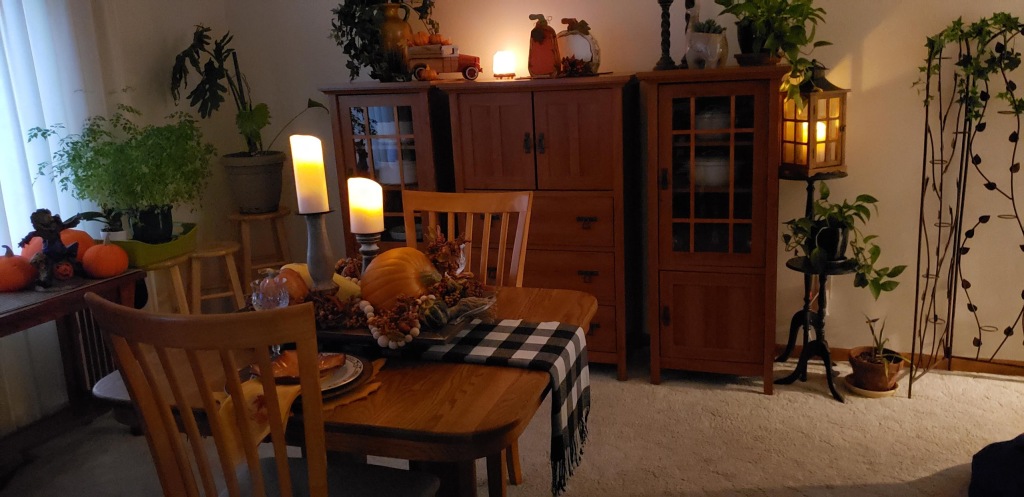
Dining room decorated

This is my dining room right now. I like what I have done so far but may be adding more things as I go. For this I only bought a few new things. I am a big fan of the black and white buffalo check. I did purchase the candlestick holders from Hobby Lobby. I bought a couple of large pumpkins at Walmart. They are plastic. I am thinking I may add some paint to them to make them look more real. I actually have a live squash in the arrangement also. I also bought the wood pumpkins on top of the cabinet. So far that is the only new things in the room.

The wood pumpkins I thought were cute and I thought maybe I could make more if I wanted more. Of course I have not had time and I am already working on Halloween and Thanksgiving and even Christmas ideas and decorations. I found these cute wooden pumpkins at Scheel’s. The leaf they are sitting on I bought at Walmart. The pick is from Hobby Lobby.

The candle sticks I bought at Hobby Lobby. Great deals can be had if you buy during sales and coupons. I spied a few other items I want to get before Thanksgiving. The candles on top are battery operated candles that look like fire when they are on and they have a remote control and a timer built in. I have gone to this style of candles due to health issues of family members. I also love the fact that I can turn on candles in one room with just a remote control. I found the candles at Scheel’s.

The pumpkin needs me to paint it to look more real. I bought it at Walmart. Everything else I had from past years. The tray I bought this spring for another decoration at Scheel’s.

This scarecrow I made out of ceramics and painted it. I loved every minute of painting this. I was trying to make it as realistic as possible on a ceramic figure. I poured it and fired it and painted it in 1983. To my surprise I have not accidentally broken him.

The fabric pumpkins my sister made for me one year.

The charger under the plate was found at Walmart a few years ago. And the leaf plates and leaf placemat were also. I added the machine embroidered napkins this year. I make and sell these. (link)

This is my kitchen table. If you have not guessed it by now I love plants and this is where I winter over some of my plants that go outside on the patio in the summer. In the winter it is great because it feels like summer here. The centerpiece I also made this. I poured it and painted it in 1999. The scarecrow my sister made for me a few years ago.

Here is a close up of the napkins that I sell. A set of 4 for $48.00. Right now you can get them in these two colors. May be adding a rust colored set also.

Decorations

Adding some Pumpkins

I don’t know about you but I continuously decorate until the next holiday. I am always looking for some new tiny thing to add to my decorations. I try to use the decorations from last year and change them all in some way or another. One good thing I started doing was putting zippers in all pillows so I can change just the covers and not the whole pillow with every season or holiday. I decorate for Autumn and not specific to Halloween or Thanksgiving for the most part. This year I am adding a witches theme to my Halloween decorations. Pumpkins are one of my favorites as is Autumn leaves. Here are some of the things I have added.

This pumpkin is a paper Mache one found at Hobby Lobby as was all the supplies to make it. I painted the pumpkin and made a bow out of raffia and floral picks.

Another pumpkin I did was also paper Mache and I covered it with leaves. I saw this done somewhere online last year and wanted to try the idea.

This is in my basement studio. We are renting so we cannot finish the basement so I covered the ceiling with muslin fabric so it feels more like a finished room.

More pumpkins around the house is the free standing lace pumpkins. If you do embroidery the pattern is found on the Embroidery Online by OESD and for those who do not I sell them also on my website (roxannestorliedesigns.com)and soon Etsy store.

The pumpkins will have little battery operated tea candles. I just have to find them at the store. That is all for this week on pumpkins. I am sure there will be more before Thanksgiving.

Till next time.

Roxanne

Decorations · Tutorials

An Autumn Gumball Machine

Since finding this old fashioned gumball machine I have been trying to figure out what to do with it. I did not want to do the normal thing by filling it with gumballs. For me this was to easy and I wanted to be more creative. So, this is the current thing I have come up with. I have decorated it for Christmas and for Spring now for Fall. This time I also put led tiny lights that is on a timer. It has turned into a fun project to see how many different was I can fill the machine inside. I hope you can find a beautiful gumball machine to decorate inside. I will show you how I went about doing this below.

Harvest gumball machine

I have seen a few of these in Flea Markets and you may even find one in the Goodwill or Arch stores. This one is actually a working gumball machine. To take this one apart I had to unscrew the top and disassemble the machine. To keep the decorations from falling down inside the machine I cut a piece of cardboard to fit the opening. I did not glue it down just for the reason I may someday want to put gumballs inside. I decided to put pumpkins and gourds inside the glass dome.

For the Spring decorations I did glue the stuff to the cardboard but made it all removeable. This was a bit harder with the pumpkins and gourds. I actually had to try to just get it to fill the inside of the glass globe. Another complication was dealing with that center pole sticking up in the center. When I lowered down the globe with the pumpkins and gourds I had to keep moving them around with my fingers so I could get them to sit in an eye appealing direction. Did not want them to be sideways or upside down.

It took a lot of adjusting the items inside to get it to look right for me. Now that I have this done I think I could have used flower picks of the season also. Might be easier and you could glue them to the cardboard.

This time I decided to add the tiny LED lights! I love the lights at night on the pumpkins. I wish you luck in finding a gumball machine and hope you have tons of fun with ideas for the inside.

I bought the pumpkins, leaves and the LED lights at Hobby Lobby.

Decorations · Shopping

Fall Decorating

I am crazy about fall or autumn, which ever you wish to call it. I love the smell, the colors, the hot chocolate and long walks in the leaves. I love the changing of the seasons and every thing that comes with the changes. The leaves have not changed colors here yet but I can’t wait. I have been pulling out sweaters and blankets and digging into all my fall decorations and starting to put them up and looking for all the new stull I would love to add this year. My first stop was at Scheel’s to see what they had put out for decorations. I want to share them with you.

All kinds of decorations were out at Scheel’s
So many pumpkins, which do I choose

Then I went to Hobby Lobby and went crazy over there. Look at some of the things that I found there.

Now that I have shared some of the stuff I saw while shopping I will share with you what I did in my next article.

I have this truck that I change out the decorations in the back of the truck with the changing of the seasons.
Decorations · flowers · plants

Autumn Decorating with mums

photo by Roxanne Storlie
Planted mums in a tin container with other plants

Decorating with mums in the fall is a lot of fun. There are so many ways to use them as well. Many of us use the mums like annuals. I have seen them decorate porches and around the yard for a blast of color in the fall. The mums can winter over in your garden if you do some prep work and turn them into perennials. When I was buying my mums this year, I found that there are not only many colors to choose from there is also a variety of mums and sizes to pick from. What fun. Now where to begin…

Photo by Roxanne Storlie
Mums planted in a pot with other plants on the front porch

When buying your mums not all mums are the same for surviving the harsh winters in areas like Colorado. Always check the tags to make sure they are for hardy zones in colder climates. If in doubt the nursery employees will be able to help you

Outdoor fall decorations, fall porch ideas, outdoor halloween decorations
the Honeycomb.com

Once you have made your choices in you mums and you know where you want to plant them you will want to get them planted as soon as you buy them. To get them established before winter hits. The key is using compost over them on the ground around them. Keeping them moist but not soaked. Planting early enough allows the roots to get established before winter. They cannot be put in pots and then later added to the soil close to winter, they will not survive. You should dispose of them. September is probably the latest in the season to plant them. One more piece of advice is to not clip the dead stems until spring.

This fall vignette with bales of hay, potted mums, pumpkins and gourds is perfect for your porch or deck. Here are some more DIY decorating ideas. #diydecorating

Mums can be used in groupings like this on your front porch, side entrance or even in your backyard.

aporch15

Find unusual containers to put them in from baskets to tin cans.

Photo by Roxanne Storlie
Mums in a container with other plants.

Or even plant them in with other flowers for the end of the season flowers.

Mum Tray Floral Arrangement

Another idea is to use cut mums and put them in an arrangement on a table in your house.