I have always been one to lean toward homesteading. The process of growing everything I need to eat and for crafts is such a rewarding way to live, and I get that this is not for everyone. I would love to share that doing things like this is relatively easy and can be started on such a small scale and built upon. It is now February and it is a great time to start thinking about gardening. I have already started buying my seeds to get started. Some need to be started this month. Now it would be a good idea to build a drying box to dry your herbs and flowers. I like the idea of drying herbs by being outside in the heat. I have been researching all the different models that have been made trying to decide which one I like and which will work for my space. I have a very small yard.
Jpeg
As you can see you can make a drying rack out of almost anything and any price range. You can be as creative as you wish. I grow more herbs and flowers than vegetables because of the size of my yard and how much sun I have. In the meantime am focusing on herbs for cooking and for my medicinal cabinet.
I have an electric dehydrator but it cannot handle the volume of herbs I grow. I started with making herbal extracts for cooking and experimenting a bit with medicinal herbs. I hope to expand this year.
Here are more ideas for you for building a drying rack. Some of them are quite small and made with things you can find around your home.
I hope that you find one that you like and start drying herbs and flowers. I would love to see what you do and what you dry on the racks. I hope to experiment with several styles and find places in my tiny yard to do this. Another item is greenhouses. They come in all sizes and shapes. I like to make small ones with picture frames but here are some made from windows.
I am so excited to get started on my garden. I did manage to save some of my herbs in small pots in the house for this season. Good luck and have fun and hope to see your creations for the garden.
It is that time of year to harvest and preserve what you grew. There are so many people now gardening and preserving since 2019. For some, it has been a huge learning curve for both. I personally do not have a huge yard to grow all my own food so I have to be resourceful in getting the food to can. I do grow a lot of herbs, for cooking and adding herbs for family health. The benefits of growing and preserving your own food far outweigh eating out or fast food. I have been experimenting with different pots and sizes pots to grow vegetables in my yard. My biggest issue is not enough sun in a large enough place to put in beds.
I buy my vegetables and fruit at Farmers Markets when I can. I also found that Costco has a good supply of organic vegetables. I get overjoyed when friends share their harvest with me. I return the favor by giving them some of the items I have canned.
Each year it is a big deal here to get fresh peaches from the western slope. They are so good, sweet and can very well. This year I canned the peaches and made peach jam. If I get more I will make up more recipes with peaches. For me, part of the fun is searching for all kinds of recipes to can.
You will need about 18 pounds of peaches to can 7 quarts of peaches. One pound of peaches is approximately equal to 3 medium peaches.
To easily peel peaches (or tomatoes!) all you need to do is dip them in boiling water for about 30 seconds and then quickly dunk them in cold water. The peels will slide right off!
As you are slicing the peaches, you need to treat them to keep them from getting brown, as peaches will brown quickly when exposed to air. Get some citric acid or Fresh Fruit it is a powder you can get in the canning section of the store. Mix 1 tsp. of Fruit Fresh with 1 gallon of water and place the peaches in the solution until you are ready to put them in the jars. This is what takes the longest when canning, all the prep work.
You will want to wash your jars in the dishwasher and time it so they are hot when you start to fill your jars with fruit.
While your jars are in the dishwasher get your canning pot ready by filling it 2/3 full of water and heat it on medium.
I put the lids in water in a small pot on the stove, and bring the water to simmer. I use a magnetic wand to pull the lids out when I need one.
To prepare the syrup, to make 7 quarts of peaches, you want to combine 8 1/4 c. water with 3 3/4 c. sugar in a large stock pot. Heat until sugar is dissolved.
Once the sugar is dissolved, start putting your peaches in the hot jars. I use a funnel that fits perfectly into the mouth of the jar. Once you have filled the jar with peaches, add the syrup, and fill to 1/2″ headspace. I wipe the jar top to make sure there is no liquid and then put the flat lid on top of the jar and put the bands on. Screw them on tight but not really tight. If they are not on tight they can pop open in the water bath.
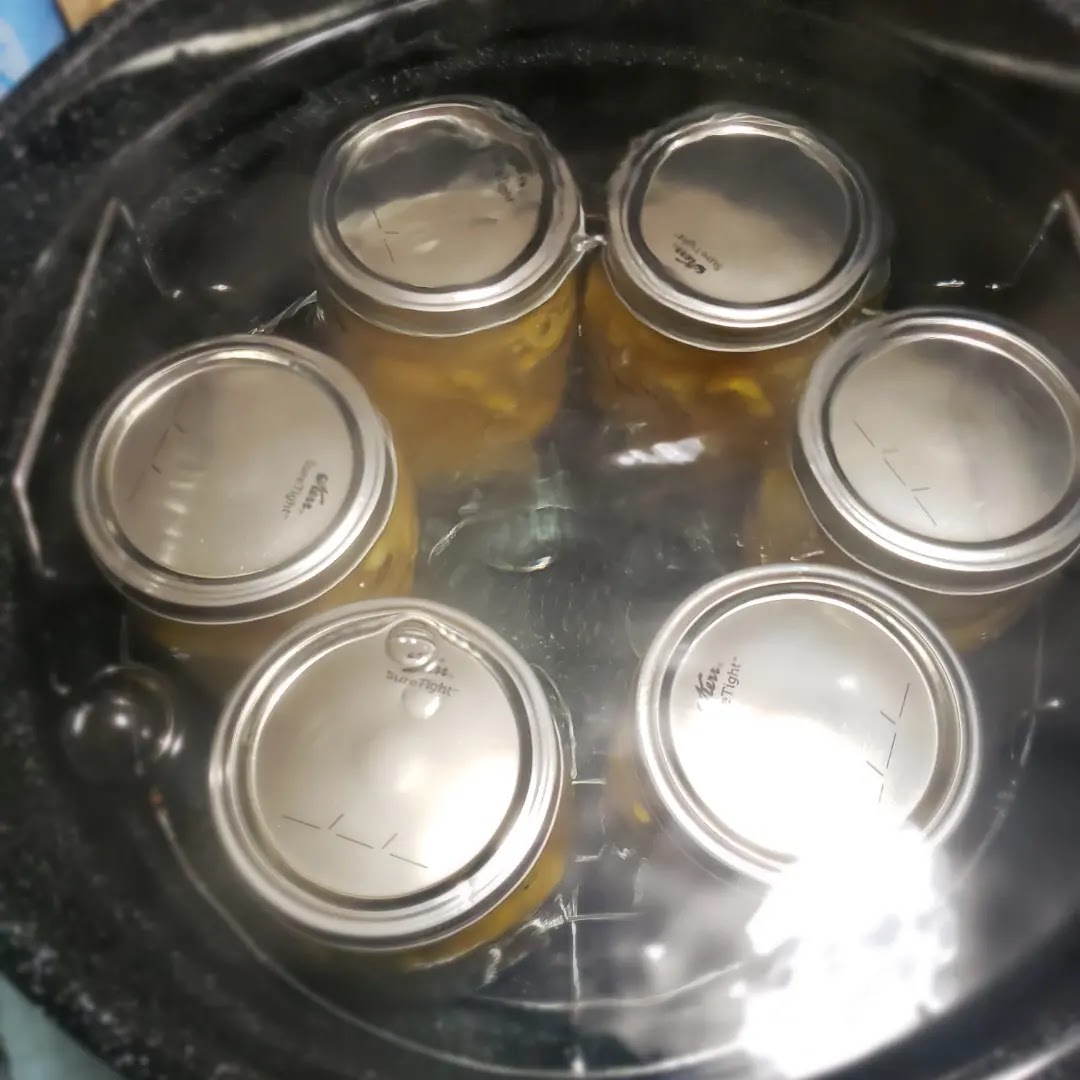
My canning pot will take 7-quart size jars. Once you have your jars full add them to your canning pot. Water bath (cooking in water vs a pressure cooker) your peaches for 30 minutes.
Once they are done cooking take them out of the pot, and put them on a towel (to soak any water). Try not to move them until they are completely cooled. You should hear them seal when they make a popping sound. To see if they are sealed you can look at the center of the lid. If it is inverted it is sealed. If there was no change check it. You can do this by gently pressing in the middle of the lid if it gives, it is not sealed.
You can store the peaches for 1 to 2 years, as long as the seal has not been broken.
STRAWBERRY JAM
One of my family’s favorite jams is strawberry. This year I made 24 jars so far. One of my biggest issues was learning about, How many strawberries do I need to make jam? Jams are also done in a water bath.
As with all canning sterilizing the jars is very important. I use the dishwasher to clean and sterilize as many jars as possible.
8 cups of strawberries (this is like two of those large store-bought containers)This will measure out to approximately 5 cups of hulled (taking the green stem out) and chopped strawberries. Once you have them chopped it should roughly be 5 cups.
5 cups crushed strawberries
7 cups of sugar
Sure Jell pectin
Measurements need to be exact or else it won’t set. Put the strawberries in a pot and begin cooking. Stir in 1 pkg of Sure Jell into the cooking fruit. You can add 1/2 tsp of butter to reduce foaming, if desired.
Bring the mixture to a full rolling boil stirring constantly.
Add sugar to the fruit, return to a boil from exactly 1 minute, stirring constantly. Remove from heat. Skim off any foam with a metal spoon.
Ladle the fruit mixture to 1/4″ from the top. Wipe the jar rims and threads. Then put the flat lid and bands on the jars. Place on a rack in the canning pot. Water should cover the jars by 1 to 2 inches above the jars.
Cook in the canning pot for roughly 10 minutes. If in high altitude you will need to cook for longer (20 min?).
When the jam is done cooking put them on a towel to set. They will start to pop shortly after as they begin to cool.
I am looking forward to autumn. Not that I am in a hurry for summer to go away. The summer season is just too short here in Colorado. It is a bit frustrating because I want to decorate for autumn and for Halloween at the same time. The way I deal with this dilemma is to decorate for autumn from September 1st till Thanksgiving. I also start putting Halloween decorations up slowly with the autumn decorations. Sounds like a crazy system but it works for me.
Here is an idea for you for placemats for autumn. I see ideas on Pinterest and in stores and then I try to copy them with what I have on hand.
I bought a round placemat at Dollar Tree. The leaves I bought at Hobby Lobby. It took roughly two packages of leaves for two placemats. I generally always make four placemats when I make new ones. This placemat is really easy to do.
I made another decoration for the table. I bought the wire pumpkin shapes at the Dollar Tree. The autumn leaves and pumpkins and ribbon I bought at Hobby Lobby.
I zip-tied the two wire pumpkin frames to each other. I think I may go back and add ribbon, weaving it through the wires to make it look more 3D. I wired the ribbons on the top of the pumpkin. I used autumn picks. One on each side of the bow and glued them in. I worked the bow in and around the flowers and leaves.
Whether you have a backyard or just a tiny patio creating color is easy to do. The easiest way to do this is with plants. For me, flowers bring such joy to see and be around. The second way is through painting flower pots colors or doing artwork on them, the list is endless. You do not need to be an artist either. I will show you several ideas that you can do.
I painted these flower pots white first. I printed out the pictures from the pictures I found online. I used Modpodge to put the artwork on the flower pots and once they were dry, I did a wash of a darker color to make them look old.
This group of pots was painted white and then the tops were wrapped in jute. It is quick and easy to do this style of a flower pot. I used acrylic paint.
This group of pots is done in acrylic paints and sealed with ModPodge. For the smaller pots, I did the artwork with permanent markers and then sealed them. Note: I would use an outdoor sealer to protect the flower pots. ModPodge tends to stick when it gets wet and the paint starts to peel off.
Obviously not the best picture. I painted the flower pot a sage color acrylic paint and then drew the flower on with glow-in-the-dark paint. It is a great idea but it only glows for about an hour after the sun goes down. Still on the lookout for good glow-in-the-dark paint.
This group of flower pots I painted with blue outdoor paint. Followed by permanent marker artwork. It will be sealed with an outdoor sealer as well. It is late in the season, but I would love to do a batch of flower pots out of cement. I try to come up with different ideas every spring. Have fun and be colorful. I look forward to seeing what you come up with.
I am sure like most of you I get my ideas from Youtube, Pinterest, and magazines and sometimes just go shopping and looking what is out there. Personally, I get my ideas from everything I look at. This idea is from FABEDhacks “Dollar Tree + DIY Gingerbread Christmas” on YouTube. This was her idea.
I liked her idea of watching Christmas movies and it did look like you spilled cookie-making goodies on the tray. She made cutout felt shapes to look like cookies. I loved the concept. So I bought the Dollar Tree cookie sheet, everything else I had on hand.
I painted the cookies sheet. I used Apple Barrel paints in black, red, and white. I then sealed it with Mod Podge.
I used peel-off lettering I also got at the Dollar Store and lightly placed them where I wanted them. I used a Sharpie paint pen medium point to make all the dots on the cookie sheet that helps form the words.
The letters I peeled off the cookie sheet once I had enough dots where you could read the words. Because I have an embroidery machine I had embroidered two gingerbread people and used them for placement for the wording. Once I was done I glued the gingerbread people down to the cookies sheet. I used my glue gun to glue them down.
I never planned to do half the things I learned how to do. Most of what I learned how to do was out of necessity and lack of funds. You can get really creative when you have no funds to make your home look nice. When I first got married I did not have much in the way of furniture and belongings and my husband did not make tons of money. We were in the military and had to move often. But I wanted to make my house look and feel as comfortable as possible.
When I took on this job of making a cover for the dining room chairs and the rocking chair, both turned out to be far more work than I originally thought. As it turns out the rocking chair cover was actually a reupholster job. When I started to take this chair cushion apart there was three layers to it. The top layer was a beautiful needlepoint piece. The next layer was batting, followed by a layer of burlap, and another layer of batting, again followed by more burlap. There were a large amount of tacks that had to be pulled out, and they were not easy to take out either.
Bottom of the chair
Needlepoint
Tacks
Burlap and batting with frame
Springs
Nothing left but the frame and springs
Once I got the whole chair torn apart it was decided to replace the two burlap layers. As you can see they were starting to shred and disintegrate.
First layer of batting and burlap coming off
You can see the wear on the burlap here
The burlap is starting to disintegrate
In the process of taking off the batting and the burlap it created such fabric dust. I am still cleaning up the dust. You can see it on the white batting.
Close up of what I had to take off the wood frame
This is just one layer of tacks.
Each layer of fabric and burlap was full of tacks that needed to be pulled.
small sample of the tacks that were taken out of the chairs.
Second layer of burlap
Burlap stapled to the wood frame
Used the original fabric to cut out the new fabric cover
As I assembled the chair back together, it was a layer of burlap, a layer of batting, a second layer of batting, and a second layer of burlap, then the fabric. Each layer of burlap had to be stapled as I went along.
I seam ripped apart the original chair cover and used that as a pattern to cut out the new fabric. Two of the corners of the chair were not square, and I had to make allowances for that.
I added cording around the top layer of the rocking chair cover. Trying to replicate as close as I could to how the original chair was put together. I really like the fact that I added the cording. It looks finished with it.
Reassembling the chair with the new fabric went together quickly. In the process of putting the chair back together I used staples rather than the tacks. I chose to do this because the tacks had caused rather large holes in the old wood.
If you decide to attempt a chair of your own, I would suggest you take pictures each step of the disassembly process so you can see how to put it back together. I would love to see and hear from you if you do attempt one of your own. I know you can do it.
I decided this year that I was not going to buy anything new. At every chance, I was going to buy something old or used and upcycle it to either go into my home or to sell. I stumbled upon three wood chairs for free and found them on the marketplace. My goal was to get them, upcycle them and then sell them. My sweetheart sees them and says he wants to repair and sand them for me. He now wants to keep them.
Had to use various sizes of rasp files to sand inside the little squares on the chair back
Originally the chairs were very well made. Over the years, several layers of paint had been added to them. The seats were loose or broken, and there is some water damage.
He took the chair completely apart
The seat of the chair
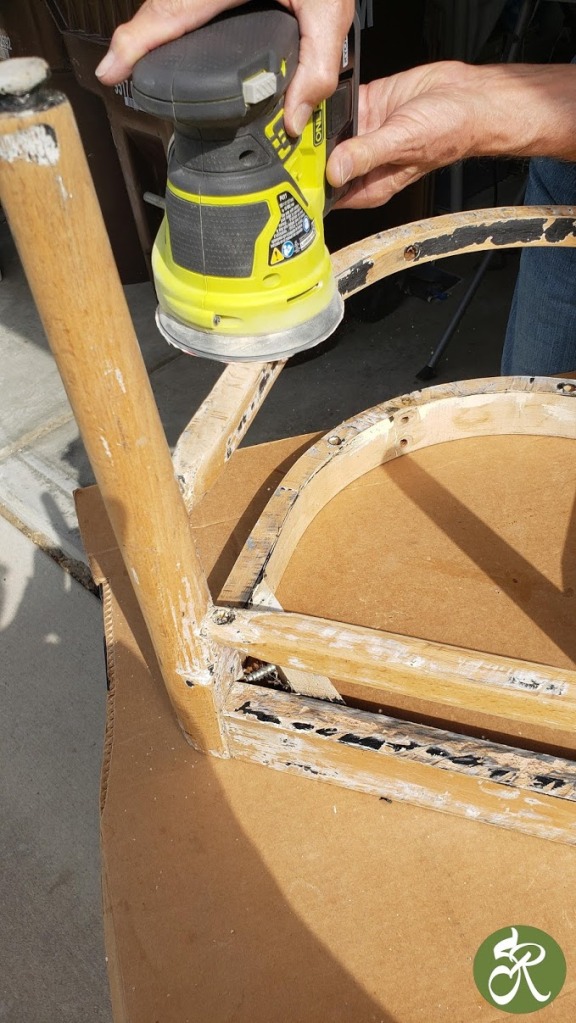
Sanding the chairs was a challenge. I do not know what type of paint was on the chairs. When sanding the chair, the paint came off looking like rubbery tar. We ended up buying a tool that made the whole job easy. It is a Ryobi Multi-Tool. You can change the tip, and saws, scraps, and a sander. I am sure there is more than I am aware of. We used the scrapping tool and it vibrates and pulls the stubborn paint right off.
The chair seats were difficult to sand because during assembly they had been glued and screwed together. The glue was hard and was difficult to take off. This project, which I thought was going to be a simple project, turned into a huge project.
Multi tool peeling off paint
Sanding after peeling the paint off.
Part of the chair
chair being worked on
Taking the chair down to parts and sanding them was the best course of action. Now that the chairs are in pieces we filled in cracks and any small holes with wood fill every where needed. Now that I have painted the chair, which I love the color, I think I may add an antiquing gel to the chair to give it a more aged look.
The paint that I used on the chair is paint and primer all in one. In Hindsight I did not check to see if the paint was outdoor paint. When I get all three chairs done, I will add a waterproofing solution to protect them from the weather. The chairs will not be out over the winter in the snow.
Vintage Dinning Room Chairs
I am also recovering some vintage chairs for a client. This turned into a much larger job than I thought. The fabric was tacked to the chair frame. The volume of tack holes in the frame this was not the first time the chairs had been recovered. I must tell you, having the proper tools for the job is essential.
Tacks used in the chair covers
I used the old fabric to make a pattern for the new chair covers. I also added some batting to the seat to make it a bit more comfortable. In these chairs I left the burlap tacked to the chair. It was in surprisingly good condition. The new fabric, I used a staple gun to attach it to the wood frame of the seat.
I have several projects lined up to do. I have more to blog about on this subject. I am always looking for interesting things to upcycle. If I can get them free it is great, but usually, I am going to garage sales, Goodwill, and Arc. I also inherit things from friends and family.
I love greenhouses, any size. The more creative, the more I love them. Upcycling is where I try to make something out of something else. My current yard is not big enough for a full size greenhouse. I would love to have a 40 foot greenhouse where I could grow things year round. This summer I want to find some windows to build a small greenhouse. Until I get to that project I decided to try an even smaller greenhouse. I was inspired by Pinterest. I love how they came out and plan to make more and make changes to make them even more my own style.
Materials you will need:
You will need 6 picture frames. (I bought mine at the Dollar Store)
Laser cut frame (I bought this at Hobby Lobby, sometimes they have them at the Dollar Store.)
E6000 glue
glue gun
paint (color of your choice.)
water sealer (if you are putting it on the patio)
Box cutter
Laser cut frame
6 frames the same size
Take the glass out of the frames
You will take the frames glass out and the little black things that hold the glass in the frames. Set the glass aside for now. The rest you can throw away unless you can think of another project to use them for. Once you have all the frames without glass you can gently sand the frames and then I painted it with color of paint of your choice. I used chalk paint.
Once the paint is dry I antiqued the frames. There is several ways to do this. I used Burnt Umber acrylic paint. One greenhouse I dry brushed it on and wiped off what I did not like. The second greenhouse I did I just watered down the paint to a water color and painted it on and wiped off what I did not want.
Once you start constructing your greenhouse you will want to reinforce the roof. To do this you will glue first with E6000 and then with the glue gun. The reason for this is so the glue gun glue will hole the pieces together until the E6000 dries. You will glue a dowel on the inside of the roof and let it dry.
You will be gluing the glass back into the frames. It is not the neatest job to do this. I used both glues to do this. I did all 6 windows at this point. You will want to give this some time to set before continuing because you will be handling this greenhouse a great deal.
glue sides together, the roof has a dowel at the peak
If you do not use the dowel the roof will not stay together.
You will glue the top side of one frame to the side of another (see example). Until you have all four sides glued.
At this point once everything has dried and the glues are all set you will want to go around the roof and make sure the roof is glued to the house anywhere they are touching.
Now this laser cut from is made from balsa wood and easy to break. You will want to measure where you want to put this on the house (or not at all if you want). To cut this use an Box cutter, anything else will just break it to pieces. This will need to be painted and antiqued like the rest of the house. As you can see I put one at each end of the house.
There is no bottom to the greenhouse. You just set this over the top of what every you want to display.
Very easy to make this and if it is glued together well it will be very sturdy.
As you can see each one is unique and you are only limited by the size of the frames. The small greenhouse is with wider frames and came out just a nice. It is made exactly in the same way that the larger one was.
I hope that you try these out. I made an extra one for my mother for Mother’s Day. She loved it.
This last year had quite a few changes that many of us do not have a handle on. The biggest thing was COVID-19. Many of which have profoundly changed our lives. If you are anything like me, we have gone through a roller coaster of emotions, fear, worry, panic, anger, etc. And now regrets and sorry. We have had restrictions requested of us to wear masks when we could shop, get food, and more. I think most of us had become content in everyday life. We were comfortable. Most of us discovered many did not like any restrictions put upon them.
As the year progressed, many people lost jobs, lost their homes, and worse. Not to mention that we cannot be with family. We are isolated, and many have had to deal with death.
We have also had to deal with a difficult four years of the current government. Without taking sides, the political year has been tumultuous. Having said all this, I hope some of my articles have been helpful.
Now, this may seem crazy to some but, I decorated my house for Christmas in November. Right after Thanksgiving. Which many of you thought was a good idea also. I still have up my Christmas decorations because I love Christmas. I decorate more for winter than for Christmas. This way, I can leave up my decorations for two months. I love that it makes me happy, and I think we need all the happiness we can find, anywhere we can find it.
This year I have decided to continue making Christmas decorations, foods, and presents.
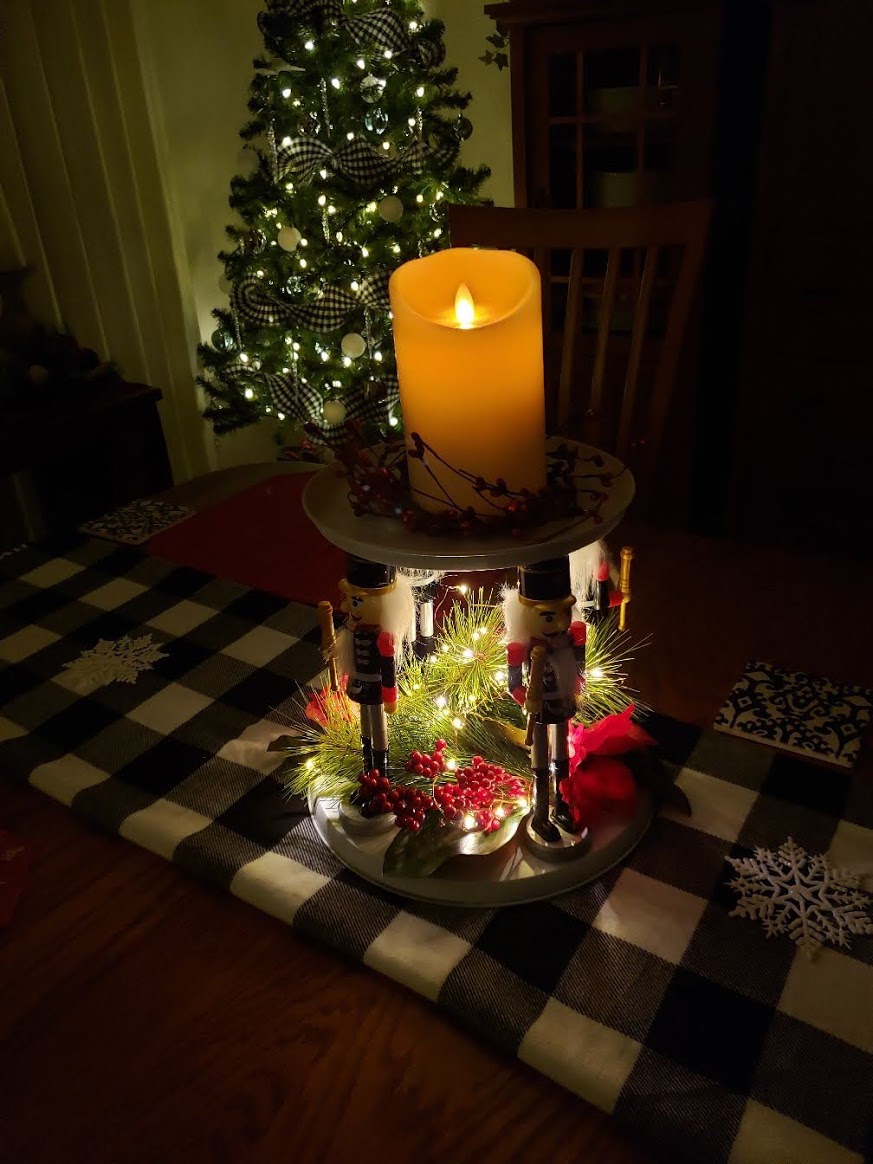
Making the nutcracker centerpiece was fun. I found the nutcrackers at the Dollar Store. I chose four of the same style and I chose not to paint them to match a color theme. I have so many nutcrackers and my colors are dominate red, black, white. The base and the top of the centerpiece is actually covers for your stove. We had bought new ones and had these on hand for several years. I sanded them and spray painted them white and did not worry if it covered it solidly. I wanted a slightly farmhouse feel for it. I did buy flower picks two of them.
Materials
4 nutcrackers
2 sizes of stove top covers
plants of your choice for the center
1 set of tiny LED lights
E6000 glue
Hot Glue Gun and Glue
Start with the stove top covers. If they are new or used you will need to rough sand them so the paint will stick. I used a white color spray paint. Once they are dry you can start to assemble this. Figure our your placement of the four nutcrackers.
Once the stove covers are dry, begin placing the nutcrackers where you want them and glue them down with E6000 and hot glue gun. The reason for both glues is E6000 is strong but dries slowly. The hot glue dries quickly and will help hold it in place until the E6000 dries.
When you are done gluing the nutcrackers in place you can glue the greenery of your choice in the center of the cover.
The top is a stove cover flipped upside down. This way it can hold things in the cover. I chose not to glue anything on the top because I wanted to be able to put a plate of cookies on the top, or a what every you can think up. I chose to use a battery operated candle with some decorations around the candle. None of which is glued down. Gives me some options. Once I was done then I added LED tiny lights in the center bottom. I hid the battery box under the greenery.
Do you have a New Years Resolution? Did you make one this year?
What would you like to do? I attempted one. I can share with you my resolution list. Just maybe inspiration will hit you. (These ideas are because we are pretty much staying at home.)
Lose weight (of course, this is on the top of almost everyone’s list)
Better health (this I already started by cooking most of my meals from scratch and healthier choices.)
Exercise more
Do more video calls with family and friends.
Downsize and organize one room at a time (that includes closets and dresser drawers)
Go through all my spices and check the dates and if they have gluten in them.
I will organize all my photos and share them with the family the pictures they might like.
I will organize my files on my computer and in my file cabinet.
I will read more books.
I will learn five new things this year.
I will work on self-improvement.
Be kind
Learn how to build a solar panel
Learn more ways to be sustainable.
I have a bunch for business that I want to do also. I thought I would share my personal ones for now.
I get so busy with holiday planning and what I want for food and decorations I had not stopped to think about this year. During a pandemic, what do you do? How am I going to enjoy the holidays when it is all about being with family? I can tell you this, I grew up bouncing all of the world. I was not always near family during the holidays. Because of that we learned how to celebrate when we could and we cherished what few time we got back to visit with grandparents and cousins etc. My goal has been to create each holiday as special as I can so that whoever can make it home feels welcome and loved. I do not have all the answers on how to do this but I have a few ideas I would love to share with you.
It does not matter about how much or how little money you have. What is the most important is family. During this pandemic I would suggest you take tons of pictures for family and share them with them often. I think the greatest thing that has happened is the software Zoom. This would be wonderful to have that turned on to connect every one in real time. Sharing your home and the food and the laughter together.
Now if you are lucky enough to be able to have a couple people over for the dinner I know seating your guests may be an issue to have social distancing. I do not want to get into whether you should or not, or wear a mask or not. Ultimately it is your choice. I am going to assume everyone will. If nothing, else you should keep the areas as clean as possible with everyone in the house.
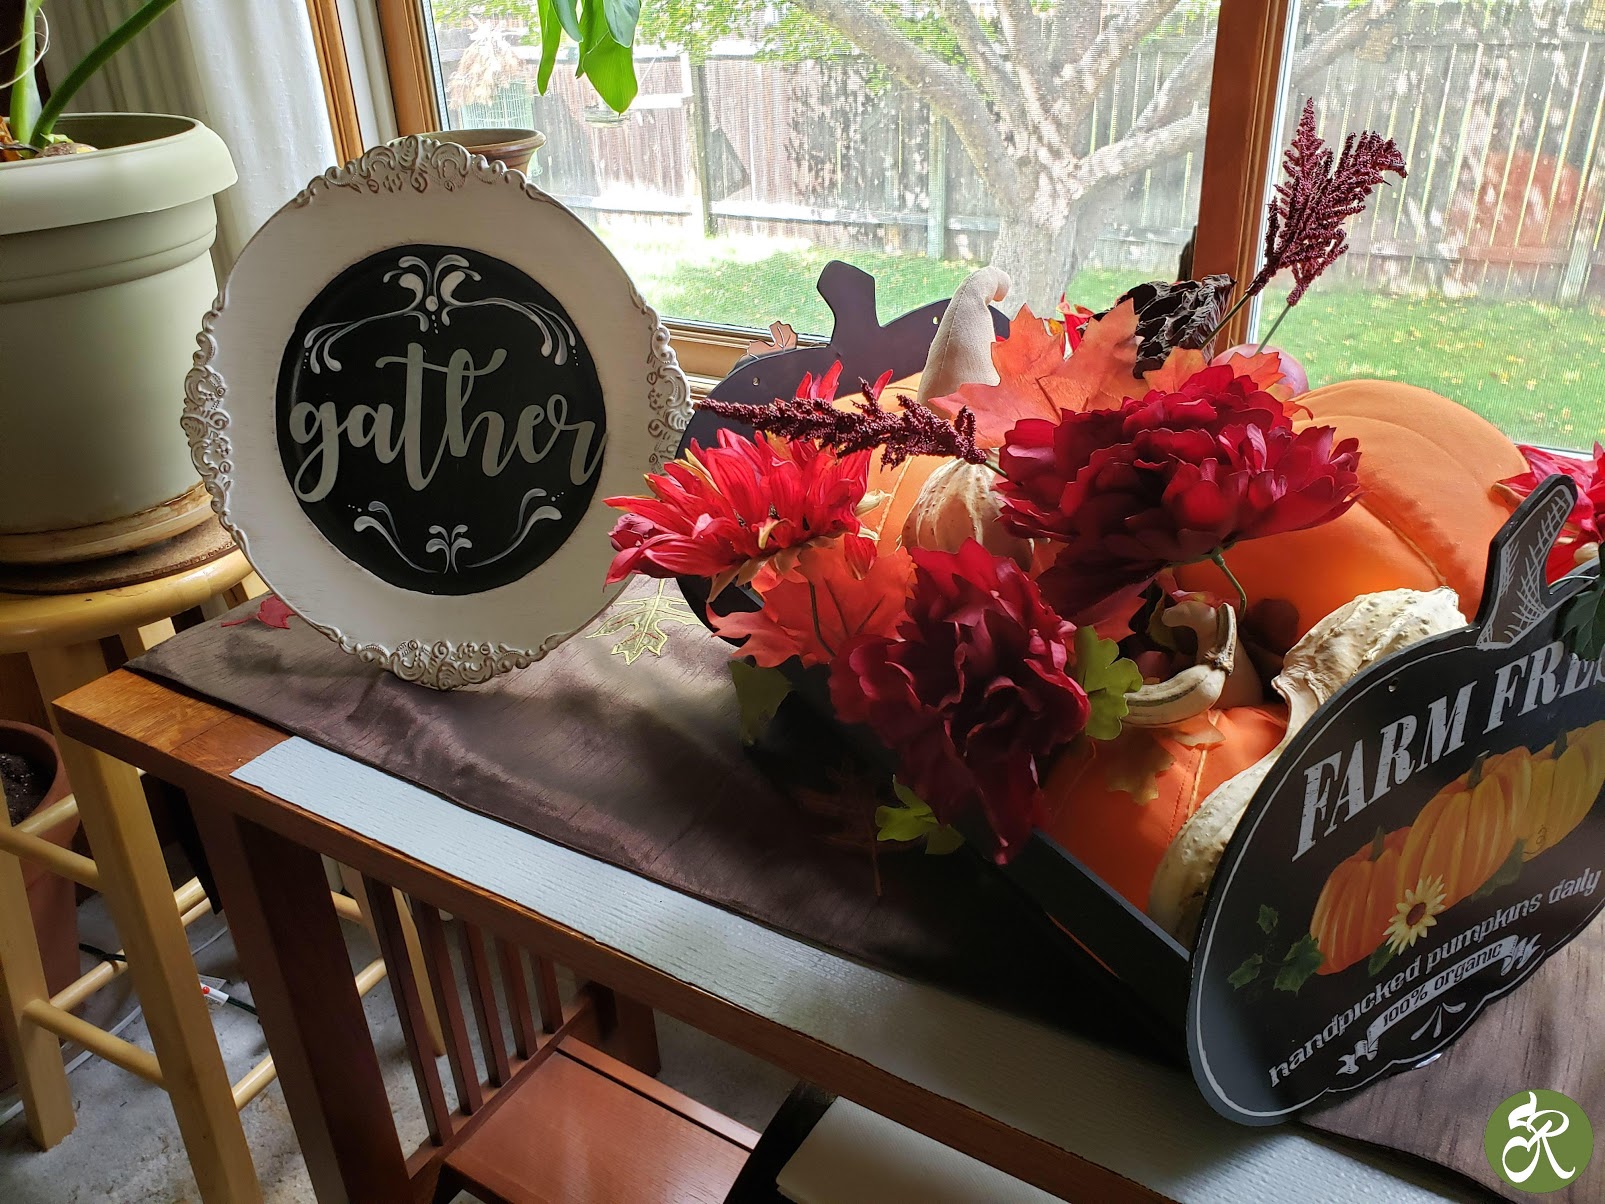
Charger plate for Thanksgiving
1 Charger from Hobby Lobby
Black chalk paint (I got this from Hobby Lobby also)
White paint
1 metal word that says “Gathering”. from Hobby Lobby
1 plate stand from Hobby Lobby
glue gun
mod podge
The plate was already white so I did not have to do anything to it. I then painted the center of the charger with black chalk paint. I put the word on the plate so I could figure out how to do the line painting. I did not glue the word down yet. I freehand painted the lines and as you can see they are not perfect. Once I was done with the painting and dry I sealed the plate with one coat of mod podge. When everything was dry I glued the word “gathering” down to the plate.
I hope you try this project because it was one of the easiest projects and would make a great gift for Christmas to someone special. I will have more ideas for gift giving also.
Here is another quick project for you to do for the holidays. A Rope Trivet.
You will need rope this can be found at Walmart
Threads of your choice. For the project I used variegated thread
If you choose to embroider it pick a pattern with less stitches. The embroidery machine had no problem embroidering on rope but if your pattern is to dense it will give you problems This pattern is from Embroidery Library and is called “Autumn Harvest Potpourri Wreath L7134
I started by zig zagging around the rope itself to get more color. But you do not really need to do that. You can get the same look as you assemble the trivet.
1
2
3
Step 1. If you choose to stitch around the rope before you start. If you don’t want to spend that much time then skip to step 2.
Step 2. For this part it may be a little difficult to get it going. I did not photograph this step so sorry. Start at the center and start coiling the rope around and around. When it get to the size you see in photo 2 stick straight pins in from the sides all the way around. This will hold it together to help you get started. The zig zag stitching starts at the center. Be sure as you are stitching your needle catches on side then the other to connect them together. As for the size, you can stop at any size you want. I do somewhere between 7 to 10 inches in diameter.
Step 3 Is if you have an embroidery machine. If you do not you can buy most of the patterns for hand embroidery also. This step is optional.
To finish I just coiled the end back under itself and stitched the zig zag stitch really close to catch as much as I could.
I also decided to do red apples in my kitchen for fall and winter so I made a wreath of apples.
For this project I got the wood frame at Joanne’s.
The apples and greenery I got from Hobby Lobby.
The ribbon I got at Joanne’s
The wreath I got at Hobby Lobby
Black and White acrylic paint
paint brush
glue and glue gun
1
2
3
4
Step 1 I painted the center of the frame white
Step 2 I painted the frame black
Step 3 I first laid out the greenery on the wreath to see where I wanted it. Then I added the apples. I glued everything down when I was happy where they were.
Step 4 I cut a piece of ribbon that went from the back of the frame to the front and around the wreath and back. Adjusted to where the wreath fell in the center of the frame and then glued the ribbon to the back of the frame.
*This is another easy project that could also be turned into a Christmas present to someone special.
Now for one project. I hope you are having some fun making these crafty projects. I would love to see what you did. Make a comment below and let me know.
This project is pretty easy also. I am not sure if this falls under a basket or not.
You will need:
The wooden ends are from the Dollar Store (Only available in the fall)
the side pieces are paint stirrers you can get at Home Depot I used the 5 gallon size but you can make this any size you want.
Black paint
mod podge
glue and glue gun
paint brush
1
2
3
Step 1 I started gluing the 5 gallon paint stir sticks on the back of the pumpkin board and tried to match it up on the other end with the second pumpkin board.
Step 2 I found that the basket rolled so I glued shorter paint sticks on the bottom to hold the basket in place.
Step 3 I painted the back of the pumpkins boards black and then the paint sticks.
As for what is inside the basket I had made several years ago 3 stuffed pumpkins and I put them in the basket. To fill it in I put autumn flowers to fill in. I would love to see what you do with your basket if you make one.
I hope that you enjoy making beautiful things for your home as much as I do. Have fun, Have a good Holiday, Family first.